The Worksheet is the soul of this spreadsheet so let's really delve into everything that is going on in there.
Note the paradigm here, the light grey & heavy bordered cells are pieces of data for user entry. The dark grey cells are labels while the medium grey cells are calculated values. Obviously the blue background and yellow bolded text is for titles. I have done this throughout the spreadsheet. The Worksheet, Calculators and Calendars are locked except for the cells that are for user entry in order to prevent accidental change. To unlock the sheets if you want to edit them, like all sheet the passwords are "unlock".
Recipe Name & Overview
This is the first section in the Worksheet. The time is calculated from the mash step times, the boil time and all the time factors. The cost is the sum of the hops, grains & yeast costs from the entire brew session, including any parti-gyle ingredients. Incremental costs for hops, grains & yeast are set in their respective tabs. The fermenter clear date is the brew date plus primary, diaceytl rest and cold crash days. The drink date is the brew date plus the sum of all the fermentation days.
![]()
Beer Properties & Style Guidelines
Here you can choose two different styles to use as a reference when composing your recipes. All the estimated values will be displayed once all the dependent variables are available. The style dropdowns will initially open in the middle of the list. Scroll up for BJCP Style Guidelines, or scroll down for the Brewers Association Style Guidelines.

Batch Size & Volumes
Next we have the Batch Size section. The recipe is designed on the basis of choosing your Packaged Volume. You also set the losses post fermentation and transfer losses from the kettle, but kettle losses factor is in the equation factors. Fermentation Volume is the sum of packaged volume plus the fermenter losses. Post Boil Volume is the sum of fermentation volume, transfer losses from the kettle, kettle dead space and hops absorption. Pre Boil Volume is the post-boil volume plus contraction losses and the product of the boil off rate and boil time.
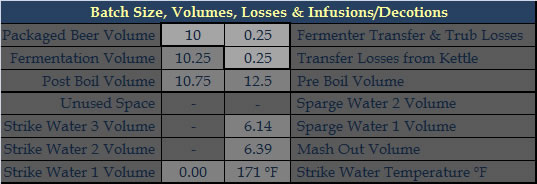
The second area in the section separated by the thick horizontal line is the mash & sparging volume section. The layout of this area is dependent upon mash type selected in the equation factors. First let's talk about Infusion Mashing. The Strike Water 1 Volume is just the total grain weight times the mash thickness divided by 4. The Strike Water Temperature calculation is more complex but it is detailed in John Palmer's How to Brew. Similarly the formulas for additional Strike Water Volumes are pulled from Palmer's book, and are dependent upon the Strike Water Temperature factor. The Mash Out volume is to compensate for grain absorption and will get the first runnings up to the proper volume. Sparge Water Volumes will be equal, and 2 or 3 runnings can be configured.
When Decoction Mashing is selected the layout of the area changes. Instead of strike water volumes we now have Decoction Volumes. They are calculated based on the Decoction Temperature set in the equation factors. A triple decoction is possible for a 3 step plus a mash out. Initial strike water and mash out and sparge water volumes are still calculated the same. In a Direct Heated Mash there are no decoction or infusion volumes to calculate.

Mashing Schedule & Measurements
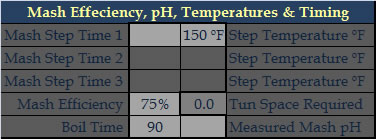
The Mash Schedule is configured in this section. Only the Tun Space Required is a derived value, everything else is a user input. The Mash Efficiency is the predicted value based on your previous measurements. The second & third steps are grayed out in this image because the mash is configured for only one step. When a 2 step or 3 step mash is selected the appropriate cells will light up. The Boil Time set here is a factor in calculating the gravities and first wort hopping utilization.
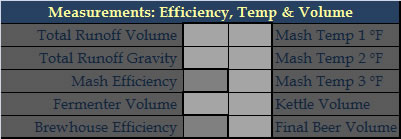
The the left of the Mash Schedule is where you enter your measured values for the mash & volumes. The Brewhouse Efficiency is calculated based on the Final Beer Volume. Use the Mash Efficiency calculated here for predicting future batches.
Fermentation Schedule
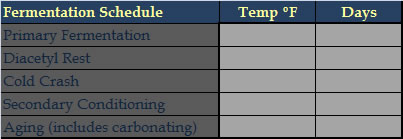
Not all of the fermentation stages need to be filled in. As soon as one of the Days values is entered the date calculations at the top will work, and as soon as one of the temps is filled the Priming Sugar calculation will work. These timeframes are also used for the Calendar tab allowing you to plan your brewing schedule to optimize fermenter times & cold storage.
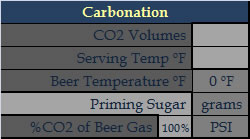
Carbonation
Forced Carbonation Pressure is based upon the Serving Temp & desired CO2 Volumes. The Beer Temperature is the highest temp reached in the fermentation process. The Priming Sugar cell is a dropdown to choose which type of sugar you will use to prime and the result is measured in grams. You can set the Beer Gas Percentange of CO2 in the case that you will be serving with a beer gas mixture. Set to 100% for pure CO2.
Grains, Extracts, Adjuncts, Spices, Etc.
This is the Main Ingredients Section. The first column is where you choose the ingredients. The data is pulled from the Grains tab. Enter your grains, extracts, sugars, ciders, honey and all fermentables here. Also tracked here are boil ingredients like Whirfloc, spices, yeast nutrients, etc. The pounds column is pretty straight forward, however for the other types of ingredients be sure to use consistent units, like 1 Whirlfloc tablet, or 1 oz of coriander. This will keep the cost calculations accurate. In order to keep mash & boil calculations from getting messed up use the Late column to set how the ingredient is treated. Mash is obviously for grains that will be put into the mash. No means the ingredient is not a late addition to the boil; this is primarily for extract that is added at the beginning of the boil for gravity calculations. Yes is for stuff you will add the boil late, and it will affect gravities based on the Extract GU Factor. Skip is used for ingredients that will be added post-boil. Steep is for when you are making an extract batch and will steep specialty grains, they will have no impact on OG.
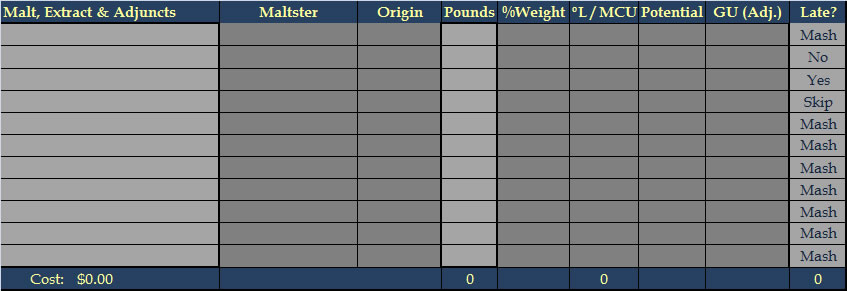
Pounds are only added up for the mash, the MCU are summed but Morey's formula is used for predicting SRM of the beer. GU is the total potential gravity units provided by the grain, Adjusted GU is the total potential times the predicted mash efficiency, and the sum below the Late column is Weighted Adjusted GU which takes into account the late extract addition. BTW, I use Yes if I'm dumping sugar into the boil at like 15 minutes. The individual values for each WAGU is actually hidden in the spacing between the Malt & Hops sections.
If Parti-gyle Brewing is enabled, then the mash ingredients will be used to calculate the runnings gravities, and the extract will be divided up between the brews based on the ratio & the parti-gyle tables. Then the non-mash fermentables added in this section will affect the first beer based on its Yes, No, Skip setting. Just like I hid some individual values before, there are values way over on the right if parti-gyle is used that are out of view.
Hops Additions
The Hops section is fairly straight forward but there are some special cases. The dropdown is driven by the varieties in the Hops tab. If Hops Aging is enabled, then the AA% displayed will be based on the Hops Storage Method, Temperature and Date Purchased. At the bottom of the Utilization column is a dropdown for choosing between the Tinseth and Rager methods. Utilization factors in the average of pre & post-boil gravities, whether the hops are leaf or pellet and if the hops are first wort hops. In order to mark a hops as First Wort Hops in the time cell enter "FWH". Similarly for Dry Hopping enter "dry hop".
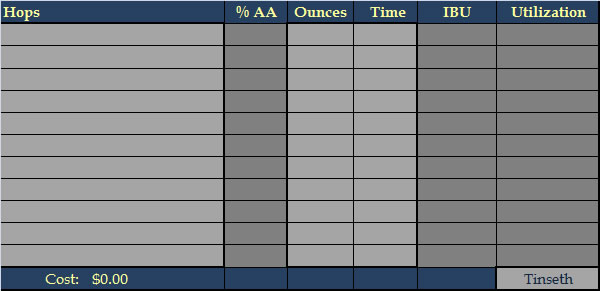
Originally I had the option of composing the recipe in either Ounces or IBUs (with the ounces calculated for your additions). When I added the hop absorption factor I ran into a situation where I have a circular reference with the IBUs. If I can resolve this circular reference then the feature will be restored.
Yeast & Starter
For the sake of the width of this webpage I'm splitting the Yeast section into two screenshots.
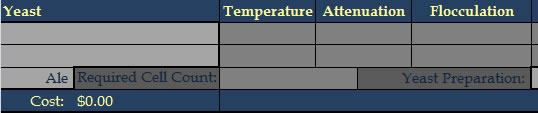
I built the space for two yeast strains to be listed, for those times when you primary with one but the finish it off with another. The dropdowns are pulling their data from the Yeast tab. Choose Ale or Lager in the dropdown to get the appropriate Required Cell Count which is dependent up on the Original Gravity & Fermentation Volume, as well as the ale & lager factors. The Starter Volume is predicted based the Yeast Preparation's cell density in the Tables tab, as well as the required cell count. The # of Packages is for calculating the Cost. Note that the average attenuation for the strain is used when calculating Final Gravity. If two strains are used the one with the higher average is used.

Notes
There are 3 sections for taking Notes. One after the main recipe items, one after the water chemistry and one after the parti-gyle section.

Water Chemistry - Adjusting Mash pH & Minerals
Again I'm breaking up the Water Chemistry section for the sake of the width of this webpage.
The Source Water Attributes are pulled from the Water tab. The Alkalinity is a dropdown allowing you to work in Alkalinity as CaCO3 or Bicarbonate (ppm) modes. The Target Water Attributes are available for you to enter optionally as a reference. The Diluted Water Attributes shows the results of dilution and the Final Water Attributes are what your resulting mash water will be. If a final value is too low it will be highlighted dark grey, if it is too high it will be highlighted in light blue. Next to the Final column is a dropdown for optionally referencing a specific Brewing City Water Profile. The Added column shows how much of each attribute has been added with salts or acids. The additions of gypsum or Epsom salts for a bitter balance or calcium chloride for a more malty balance are just suggestions for how to with the Chloride/Sulfate Balance if it is not already how you want it.
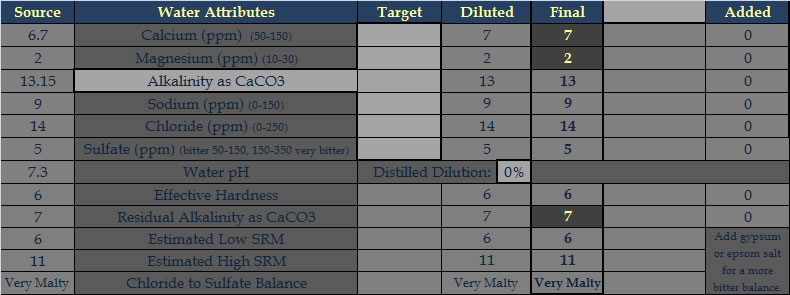
The suggestions for increasing adjust mash pH will appear in the lower right hand part of the page. If Magnesium is low an appropriate amount of Epsom Salt will be suggested to achieve 10 ppm of Magnesium for yeast health. If Calcium is low a notice will be displayed. The additions are not suggested to hit a specific Residual Alkalinity, but rather to get within the suggested range based on the SRM of the beer. Enter how much of each salt you plan to use to the left of the salt name measured in grams.

Parti-gyle Brewing Sessions
Once again I'll split the Parti-gyle screenshot for the sake of the width of this page.
The Parti-gyle Section is basically just a condensed version of the main sheet. Mash ingredients here are not affected by the mash efficiency but instead by the Encore Efficiency. This is for when you throw in some grains after the first runnings. Extracts and other non-mash fermentables and ingredients entered here affect the second boil and resulting beer. The costs here are included in the total sum, both here and at the top. The Volumes are completely derived from the First Beer Pre Boil Volume and all the various losses & dead space factors, etc.

The dropdown to Enable Parti-gyle Brewing is on the far right at the top of the section. Next to it is the Parti-gyle Volume Ratio which can be either 1:1 or 1:2. In this screen shot you can see when I had the feature for composing via Ounces or IBU, but currently that feature is disabled.

Printable Report
Below all the sections if you scroll down on the worksheet you will see that there is a Printable Report in black & white. The parti-gyle information is only on the report if parti-gyle brewing is enabled. This black & white area is defined as the printable area of the Worksheet, therefore, you can just choose print from the menu and only black & white report will be printed. I didn't bother taking a screenshot of this.
Macros: Recipe Exports, Inventory Managment, Toggle Gravity, Etc.
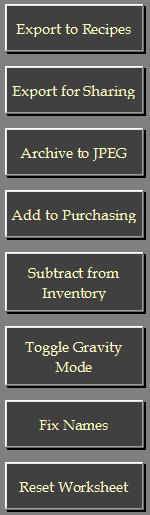 There are 5 Macro Buttons and all of them work from tabs in the Recipes file as well as on the Worksheet.
The first button will Export the Worksheet to the Recipes file. You will be prompted for a tab name in the Recipes file. If the tab name does not exist a new tab will be created. If the name does exist you will be asked if you want to overwrite the existing tab. If you cancel at any time the export will be aborted. If the Recipes file does not exist, you will asked if you want to create it. This button is also used to "Import a Shared Recipe". If you have a shared recipe file created by the "Export for Sharing" button, then just put that file into the same folder as your Brewing & Recipes files, open it and click this button to "import" the recipe into your main Recipes file. Let me know if this doesn't make sense.
The second button allows you to Export a Recipe for Sharing. It works exactly like the first button, except that it asks you for a target filename first. You only need to give the file name not the extension as .xlsm will be added to whatever you specify. You can export as many recipes into a file for sharing as you wish. If someone gives you a file that they created with this button, you can place it in the same folder as your Brewing & Recipes files and then use the first button, "Export to Recipes", in order to "import" a recipe into your main Recipes file.
The third button will Archive the Worksheet to a JPEG image file. You will be prompted for a file name. Enter a name without the file extension, meaning "Pale Ale" instead of "Pale Ale.jpg" The JPEG can be saved directly to a subfolder in the structure by entering a name like "Recipes\Brown Ale". If the folder does not exist, you will be asked if you want to create it.
The fourth button will Add the Ingredients to the Purchasing tab. First it will check to see if there is ample stock. Only missing items are added to the Purchasing tab, or if there is not enough in stock, the difference will be ordered. The order will be italicized as the "Next Batch" sum on the Purchasing tab.
The fifth button will Subtract the Ingredients from the Inventory. The inventories affected are the Grains, Hops and Lab tabs. If there is some of an ingredient in stock but not enough, it will be zeroed out.
The sixth button will Toggle the Gravity Mode. It will change the OG & FG columns at where the Style, Estimated and Measured values are displayed. Use the toggle to chose whether you will be entering your measured values in Specific Gravity or Plato.
The seventh button will Fix the Name References on the current sheet to match those on the Worksheet in the Brewing file. When you open the Recipes file by itself, the lookups for grains, hops, yeast, etc. will not work. This button will temporarily open the Brewing file so that the data in recipes will be accurate. It will also update all names that reference the Brewing file to match the references currently used on the Worksheet tab. Extremely useful in development, but maybe less so in production.
The eighth button is the Reset Worksheet button. Like all buttons a confirmation dialog allows you to cancel out of the macro. This button only works on the Worksheet tab in the Brewing file, it will not reset a tab in the Recipes file. This is a safety precaution to prevent losing a recipe. The export function can overwrite a tab so there is no need to reset it first.
User Configurable Equation Factors

The Wort Contraction factor is used in calculating the Contraction Losses which are used when calculating Post Boil Volume from Pre Boil Volume.
The Boil Off Rate is also used in calculating Post Boil Volume. You can use the calculator to figure out your boil off rate.
The Grain Factor affects Grain Absorption which is used for Mash Out & Sparging Volumes.
HopAbsorptionFactor only applies to Leaf Hops and affects Hops Absorption which of course affects Fermenter Volume.
LT Dead Space is for the Lauter Tun and affects Mash Out & Sparging Volumes.
Kettle Dead Space affects Fermentation Volume.
Infusion Mash is the Mash Type Dropdown which sets the Mashing Mode.
The # of Mash Steps enables calculations for the specified number of steps.
3 Runnings configures whether 2 or 3 runnings will be used.
Grain Temp is the temperature of your grain storage for Strike Water Temp calculation, which is also affected by the Temp Loss to Tun and InfusionTempFactor.
The Infusion Temperature is also the Decoction Temperature (label changes based on mode) and it affects Additional Infusion Volumes or Decoction Volumes.
The Mash Out Temp affects the Third Decoction Volume.
The Mash Thickness affects various Volumes and allows you adjust for Multiple Infusions.
Total Mash Volume does not include space for grain, it is just Mash Water Volume.
Pre-Boil Gravity is the predicted value until the user enters the measured value and then that is used.
FWH Adjustment, Leaf Hop Factor and Pellet Hop Factor all affect Utilization.
Use Hops Aging enables the adjustment of AA% based on hops storage and purchase date.
The Sealed in barrier, no O2 is the Hops Storage Method.
The Hops Temperature is the temperature at which they are stored.
The Extract GU Factor is used for Weighting the Adjusted GUs for Pre-Boil Gravity.
The various times just allow for you to predict your workload, you can rename them as you like.
Yeast Cells per Vial is no longer used, hmmm.
Ale & Lager Pitch Rates are in millions of cells per milliliter.
Dry Cell Count is used for determining how many grams are needed.
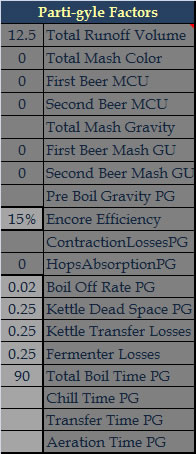
Parti-gyle Factors are only used when Parti-gyle Brewing is Enabled.
Total Runoff Volume is pretty obvious.
Total Mash Color is MCU, which is then split based on the Tables into First Beer & Second Beer MCU.
Total Mash Gravity is used for doing the Tables look up to get the split GU.
Pre Boil Gravity PG is the Second Beer's Pre Boil Gravity.
Encore Efficiency affects the GU from any grains tossed into the mash after the first runnings.
The ContractionLossesPG isn't actually used... hmmm.
The HopsAbsorptionPG uses the same factor, and is the volume for only Leaf Hops.
Boil Off Rate PG because you probably will use a separate system for the second beer.
Same with Kettle Dead Space PG, Kettle Transfer Losses and Fermenter Losses.
Total Boil Time PG is needed for Utilization of FWH & Gravity calculations.
© 2008, 2009 Diesel Drafts, All Rights Reserved